All you need...
First of all you should install CapFrameX. The latest version of RTSS is available here. Alternatively you can click on the Overlay tab of CapFrameX. If RTSS is not already installed the download link will be shown in the app. If both apps are properly installed the Overlay tab will look like this. The controls on the right side of CapFrameX can be used to fully configure the overlay.
This includes the group names (RTSS displays entries with the same group name in the same line), the colors of the individual entries, special colors when a configurable threshold value is exceeded or not reached, the text size of the entries and separator lines after certain entries.

Importing Templates
CapFrameX offers the option to use 3 different configurations which can be selected according to your needs. The corresponding files are called OverlayEntryConfiguration_0, ...1, ...2 (JSON) and are stored under Documents\CapFrameX\Configuration. If you want to share your configurations with others you can send these files or paste them from another source. It is mandatory to keep the names of the files. So if you want to keep the original file OverlayEntryConfiguration_0 for example, you have to backup it somewhere else.
Four overlay configuration templates can be downloaded here. After unzipping the zip file, configurations for all CPU-GPU combinations from Intel, Nvidia and AMD are available.

Customizing Templates
After copying one of the files into the configuration folder mentioned above you can start CapFrameX and a game. RTSS will be opened automatically by CapFrameX if the overlay is enabled. The imported overlay has index 1, so the second configuration must be selected on the overlay tab. If the current hardware differs from the imported configuration the texts of the overlay are partly displayed with a wrong color. But this can be corrected very quickly.

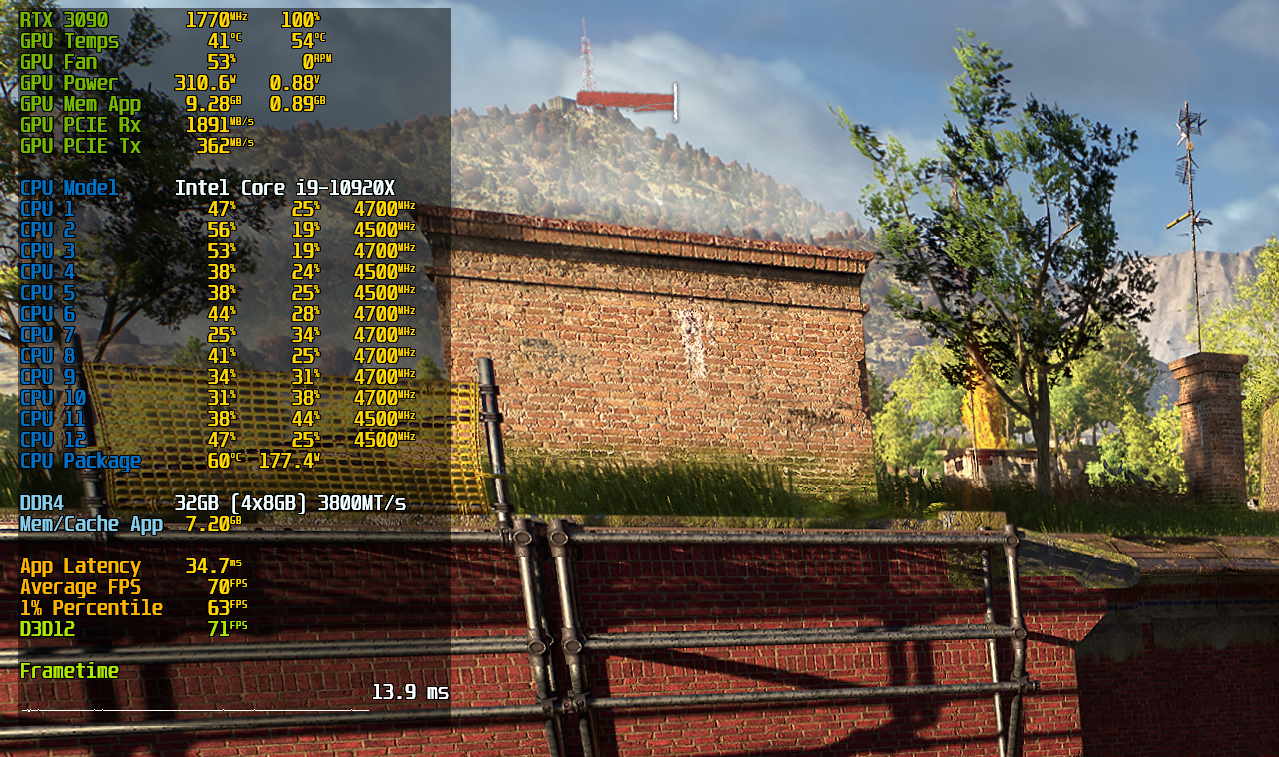
The imported config is from a system with an i9-12900K + DDR5 and an RTX 3070 Ti. However, this example here uses an i9-10920X + DDR4 and an RTX 3090. Let's adjust the entries for the graphics card first.

The first column on the overlay is for the group names. These can be edited by clicking on entries in the list (column Group name). Both entries with the group name RTX 3070 Ti have to be replaced by RTX 3090. The remaining entries do not need to be adjusted in this particular case.

The texts for the CPU should be displayed in a uniform color, i.e. the group names all get the color Intel Blue and the values the color Gold. To get this goal done quickly CapFrameX has a special feature called Apply to multiple entries.

In this area, all properties of the currently selected entry can be applied to other entries. A distinction is made between all entries that correspond to the same sensor type (i.e. temperature entries, clock entries, etc.) and all entries that have the same group name as the selected one. In addition, certain properties that are not to be adopted can be deselected via the checkboxes in advance, if required.
Now select the first entry of a sensor type in the list. In this case it is CPU Core #1 - Thread #1 (%). Then select the Group color Intel Blue (Standard Colors) under Color and limits and for the Standard value color the color Gold. Then click on the button CPU Load on the right side under Apply to multiple entries to set these colors to all entries that share the sensor type CPU Load.

Once you've done that, the overlay will look like this:

As you can see, the CPU clock rates are now separated from the CPU loads, despite having the same group name. This is because RTSS looks not only at the name itself, but also at all the format properties. Since the colors are different, clock rates and loads are treated as separate groups.
So you repeat the process for the entry CPU Core #1 (MHz) and then click again on the button to apply for all entries of the same sensor type, which is now CPU Clock. The result is as follows. The only thing missing is an adjustment of the group name for the memory.

To adjust the group name for the memory click on the entry "DDR5" and edit it.

And what about other hardware?
For example, if you have a graphics card from AMD then you can use the other template from the download link. Under the Standard Colors there is an entry AMD Red to set the correct group color for GPUs and CPUs from AMD.